Friday, October 21, 2011

Stencil the day away

This week despite not feeling all together well I decided to paint my bathroom. Well, not just paint but stencil my bathroom. I love painting a bathroom because in the course of a day or two you can completely change an entire room. Inspired by Emily's office over at Jones Design Co. I decided I would paint all my troubles away and make my bathroom a little more interesting too.


First I painted the top half of the walls with
 Restoration Hardware Silver Sage
I love this color and I got a gallon for $4 when our RH (which was the original RH) went out of business a while back. I was happy about the price but sad to see the original RH close :(

Then I made my cardboard stencil and began tracing my pattern on the walls
Thank goodness I had NPR and Pandora to keep me entertained!
Next with my favorite shade of white 
Ace Royal in New canvas
I began painting over my penciled design with a 1/4" paint brush
Several sessions and some pretty serious hand deformations later and I had gone all around the room
The lower half of the walls are now painted white and awaiting trim to separate the 2 colors

Now I could have used a real stencil and my lines would be perfect but I much prefer the hand painted look even if it does get a little wonky in a few places. In this pic you can see a sample of the trim I want to put all around the room. The trim is a job for the Mr. and I've been warned that it is a low priority so it may be a while before he gets around to it. 

Overall the room is much brighter and much more fun! I'll post a few more pics after I get the whole room cleaned up and back together.

I hope you all have a great fall weekend!


& crisp fall mornings

Monday, October 17, 2011

Enjoy the ride


Hello all my lovely friends! I hope you all had a great weekend. Ours had a few ups and downs, but overall it was a surprisingly productive weekend around here. Although I'm currently battling an intense flare up with my Crohn's, I was finally able to get around to hanging up these little jewels in my dining room.

Now before you think I might have a little problem let me remind you that I work at a restaurant and that's where most of these corks are from.

These letters couldn't be easier to make! I simply cut the basic letter shape out of thick cardstock then hot glued my corks to the cardboard. The finished letters are about 10 inches high and are able to either stand on their own or be hung on the wall. They do, however, take forever to make! Then again maybe that's just because I'm a perfectionist and have to find just the right cork for each spot.

Hopefully I will have some finished photos of the dining room to share soon but I have a few other things to wrap up first, like this darn flare up!


& plentiful corks

Wednesday, October 12, 2011

Life is what you make it {pt.2}

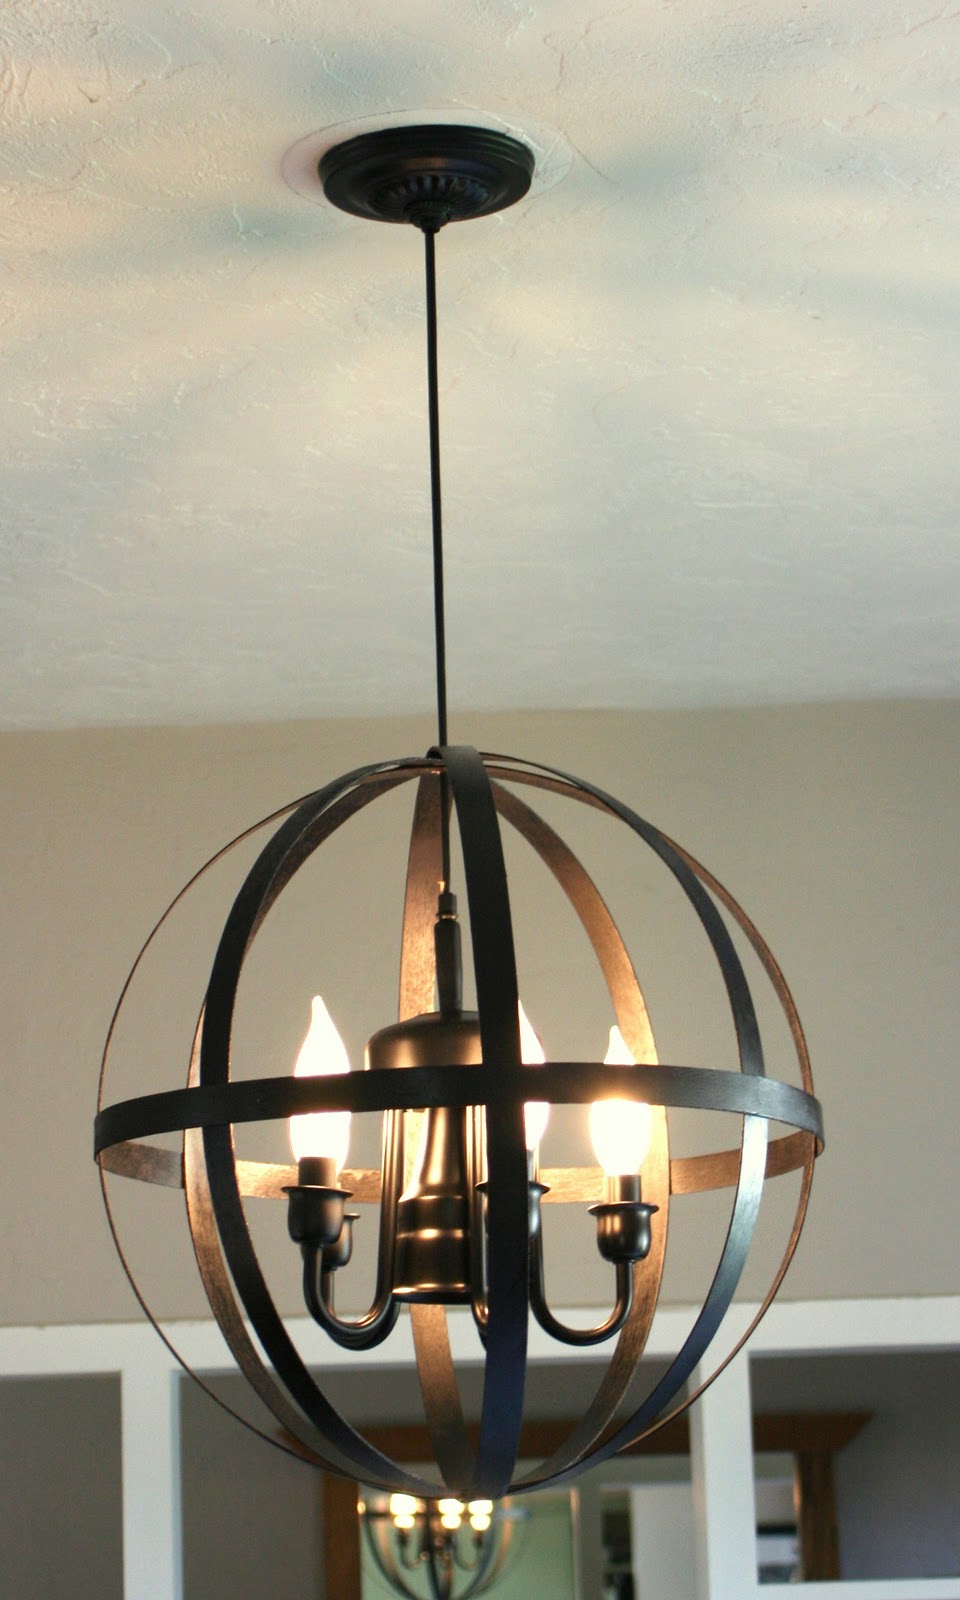
A few weeks ago I showed you the beginnings of our diy chandelier project here. After finishing gluing, rewiring, and painting I am finally finished! Believe me when I tell you that there is no more dangerous thing to do than make a ball out of very delicate wood veneer and then leave it lying around 2 little boys for a few days. Perhaps I was a little over zealous when I had my husband take down our old chandelier well before I was ready to hang the new one. A few dimly lit days later we got it all hung up and I'm in love! 

so again, we went from this

through all this
to this!

It still needs a bit of tweaking, 
I'm not loving the bulbs but they were the only ones my local Ace had.

I think I'd like to order some round edison style bulbs for it...and a dimmer!

I love the shadows the rings cast on the ceiling at night

now I just have the rest of my dining room to finish!

So what do you think? 

Tomorrow I am hoping to start my Frightful Feasts countdown to Halloween
I have all of the boys favorites plus a few new spooky recipes to share


& Pumpkin Spice!

Sunday, October 9, 2011

Italiano Eggs Benedict


I hope you are all enjoying your weekend. 
Mine started off kinda rough, my car was broken into by someone while in my driveway, I got in a fight with a complete stranger (thanks blogland!) and I had to make an emergency trip to pick up my youngest from my mom's house a few hours away because he was sick.
Yeah, pretty crappy start to the weekend!
but it got better
and it keeps getting better

I thought I'd share this recipe for my new favorite twist on the classic Benedict.This was a dish My husband and I found at a cute little Italian cafe in Long Beach. As soon as I tried it I knew I would have to make this for our next Saturday Family Breakfast. I am happy to say that it is easier to make than the usual benedict with that temperamental hollandaise.

Italiano Eggs Benedict

Good quality rustic bread (I used a sourdough baguette) but focaccia is good too!
1-2 slices provolone cheese per serving
1-2 slices prosciutto (crisped under the broiler)
2 poached eggs per serving
1/2 tbsp. pesto per serving

Toast bread, layer on cheese and place under broiler until melted. Then place prosciutto and poached eggs top with pesto sprinkle with salt and pepper and enjoy!

I hope everyone has a beautiful day,  I'll be at work all day serving breakfast and dancing to the live jazz band!

& crispy prosciutto

Friday, October 7, 2011

A Winning Book


I just found out that I won a giveaway from Chelsea over at Room to Inspire

Chelsea is a super-duper sweet blogger who has loads of great ideas & recipes
If you haven't already checked out her blog make sure you pop on over and say Hi!

Hope everyone has a great weekend!

& happy days!

Saturday, October 1, 2011

First Things First!


The Masked Chicken is obviously excited!


Happy October 1st everyone! we are all getting ready to head out (in the rain) to go to our town's annual Apple Harvest festival! Hopefully later today I'll be able to get my Halloween Decorations up before I head out to work, but until then here's a peek at what our home looked like last year all decked out. I hope everyone has a great day!


& Beguiling Foul

Friday, September 30, 2011

Green Beans with Garlic Dill Butter

Lately I have been trying to find new way to prepare our fresh green beans. There are about a million other ways to prepare them and personally I'm a big fan of oven roasted, but oven roasted takes time and makes a mess. Here is a delicious lite mess way to make some pretty fantastic green beans. They come out a delicious mix of crispy and tender and I only wish that I had more green beans so I could make it again tomorrow!
 
Green Beans With Garlic Dill Butter
fresh green beans 
1-2 cloves chopped fresh garlic 
1/4 tsp dried Dill
1-2 tbsp butter
salt and pepper to taste

*this is by no means an exact recipe. I love Butter & Garlic so I use lots, use less if you'd like : )

Add butter and green beans to a heavy bottomed skillet. Cover with a tight fitting lid and cook over medium heat for 5-7 minutes or until the green beans are starting to brown slightly. Toss the green beans around to coat with butter completely and allow to cook for 2-3 more minutes with the lid slightly tilted so some of the steam can escape. add garlic, dried dill, salt and pepper and allow to cook just until the garlic starts to brown.
Remove from heat and Enjoy!

pass the beans!

Tuesday, September 27, 2011

Book Fairy Costume


Last year I  decided I was going to be a diction-fairy for Halloween. I had been making book page wreaths for my winter boutique and this just kinda evolved out of hours spent with a glue gun and  rolled book pages. If you have made a book page wreath the this should be pretty simple. If you haven't made a book page wreath then it's still pretty easy just with a bit more reading. Rather than make a new one, I'm just breaking down how I made it last year so if it gets confusing just let me know!

Book Page Tutu
First take a scrap of fabric 3-4 inches wide and cut it to just a few inches longer than what you want the waist to be. You want just a few inches of overlap to make it easier to put on and so there is no gap in the back.

Next lay the strip of fabric out flat and begin gluing on the rolled papers in rows along your strip. I started with the bottom row and went up so the pages with lay out nicely. 
For each rolled up section of paper I used 2-3 pages together because dictionary pages are so thin. 
To make the paper rolls I like to do a mix of actually rolling the pages into cones/tubes

and mixing in a few more free formed paper rolls. Like this S shaped roll

Make sure after you roll the pages that you fold the end before gluing so the rolls spring out like a tutu and not just lay flat.
To glue the roll down you will apply glue only to the folded part of the roll and then stick it down to the strip.
Continue rolling and gluing until the entire strip of fabric is covered except for  a few inches at the end. I did 3 layers of rolled papers but for fuller tutu you could continue to add layers.
here's the 1st/ bottom layer

2nd /middle layer and you can see the top layer folded over to the side

and here's the finished tutu. Once I had the top layer all glued down I  went along the top edge and trimmed along the strip of fabric so I would have a nice straight edge. I like the raw edge look of it this way but this year I might go back and add some ribbon along the top edge to make for a more finished look.


At the end you could either attach the tutu with safety pins or fold the ends over and add a cute ribbon to tie the tutu with. Last year I did saftey pins and they worked out fine, this year I want  to go back and add the ties to make it easier to take on and off. 
Also if you are making this for a child you would want to maybe do the ties so there is no fear of poking with the pins. 


Dictionary Fairy Wings


First you remove the entire cover from the dictionary. 


I wanted fairly rigid wings that would not flap around as I walked so I took a piece of  scrap wire from my garage ( you could use a wire hanger) and bent it slightly then hot glued it to the inside of my wings. 

next to cover the wire and add some interest I glued several fanned out pages to the inside of the cover.

Near the top of the center binding I punched 2 holes and strung a large rubber band through to use as straps to wear the wings. You could certainly use ribbon here and even leave the ends long so they flutter behind you as you walk. I think that is what I'll be doing for this year!

here's what you can see of the rubber band as you wear the wings. The large rubber band made for a very comfortable fit last year but honestly I'm not sure where this gigantic band came from.
This year I will be wearing this again but I am hoping to go back and re-vamp it a little and maybe even make myself a paper corset or paper wig to wear with it. What ever I do, I promise I will not wait until the last second! 
Hope this tutorial is inspirational for all the amazing things you can do with paper! All together this costume cost me only about 10 hot glue sticks, 1 thrift store dictionary (50 cents) and about 2 hours to put it all together.
If you decide to make an outfit please share your photos!

Ladybird Ln


Visit thecsiproject.comPhotobucket

”Join


 & paper cuts

Monday, September 26, 2011

The depot

Well... I was hoping to get my tutorial up for the book fairy costume but someone's daddy was given an entire box of Thomas the Train stuff  from a coworker. 


Needless to say, pretty much everyone was entirely too busy building tracks and driving trains this weekend to get much else done!

Honestly, there must be at least a half mile of track running through my house. The excited squeals and giggles out of my little guys definitely makes hardly being able to walk around worth it!

Well I better run, my train is here! 
I'll be back tomorrow with the book fairy tutu how to, phew that's a tongue twister!


& railroad crossings!


Friday, September 23, 2011

Falling beautifully


Sometimes you look out your window and realize that the world we live in really is magic. 
This morning while getting dressed I looked out the window to see a fallen leaf perfectly captured by a spiderweb string. 

The leaf magically danced and spun in the wind hanging by a single silken thread.

These are the moments that cannot be staged or made by anyone other than the supreme perfectionist, nature. 

Completely random congruity is the only explanation.


Floating perfectly at eye level as I feverishly snapped photos. Then the breeze picked up, and then just as effortlessly as it apparated the string broke and the leaf drifted slowly to the ground.

There is something inexplicably mystical to behold such a fleeting miracle.
Nature is the ultimate installation artist!


 go outside and enjoy!
Related Posts Plugin for WordPress, Blogger...