Showing posts with label projects. Show all posts

Tuesday, September 25, 2012

Adventures in budget renovations- doors and more (part 1)

Way back in January I showed you the unsightly side of our kitchen in this post. Back then our washer, dryer and behemoth hot water heater were all still looming large in my small kitchen. But all that was okay by me because they were blocking the door that lead to a 10 foot drop to the ground below. The door had been blocked off and useless since the previous owners of our home tore down the rotting deck it once opened on to. 
looking a little cramped, right?

yup, that's a door back there!


Rebuilding the deck was on the top of our list since it is not only a mega hazard and an eye sore, but would keep a bank from financing our home when we sell it. Before we could even think about building the deck we had to relocate the washer and dryer to our garage. This meant running all new plumbing out to the garage, thank goodness all our plumbing is under our home and not run through the walls! While the garage may not be the most glamorous place to do laundry, it was the only real option in our tiny 1200 sf. home.

After those monsters were removed we installed our *new* fancy on demand hot water heater. You may remember that in January's post I spoke about how we had gotten a "gently used" on demand hot water heater...well long story short we got it installed and that darn "gently used" water heater was a lemon. After shelling out several hundreds of dollars more for a brand spanking new one I made the hubby swear to not make anymore large purchases off craigslist! After I finally quit fuming over our water heater folly it was time to get to work connecting the door to nowhere to the rest of our beautiful redwood deck.
Here is the outside of the soon-to-be door to somewhere
(don't worry this doug fir lumber was slathered with that nasty green weather proofing/bug proofing stuff before we added the decking)

all built by this handsome man!

here is a messy but finished view from the old deck to the new, if you look between the grey storage box and the blue ice chest (classy, right?) you can see where the darker, older stained wood stops and the lighter newer wood begins. 

we actually only had to add about 12 feet of deck to tie it into the existing deck but since it is quite a ways up in the air it took several summer afternoons and weekends to get it all finished. Jess has, of course, done 97% of the work on this project, leaving me just the painting and sanding and such. Having to learn as we go has been hard but it is really amazing to see how far our construction skills have come since we started! 

Tomorrow I'll be back with the second part of this huge project. This week has been crazy busy and the never ending construction in our kitchen has of course left our house upside down! Currently the entire contents of our pantry cabinets are on our kitchen table, and our kitchen counters are covered with  drills, levels, screws and plaster dust! We are almost there, and someday soon I'll be able to say that I have a FINISHED kitchen!


& Patience!

Thursday, September 13, 2012

I {heart} Funky Furniture

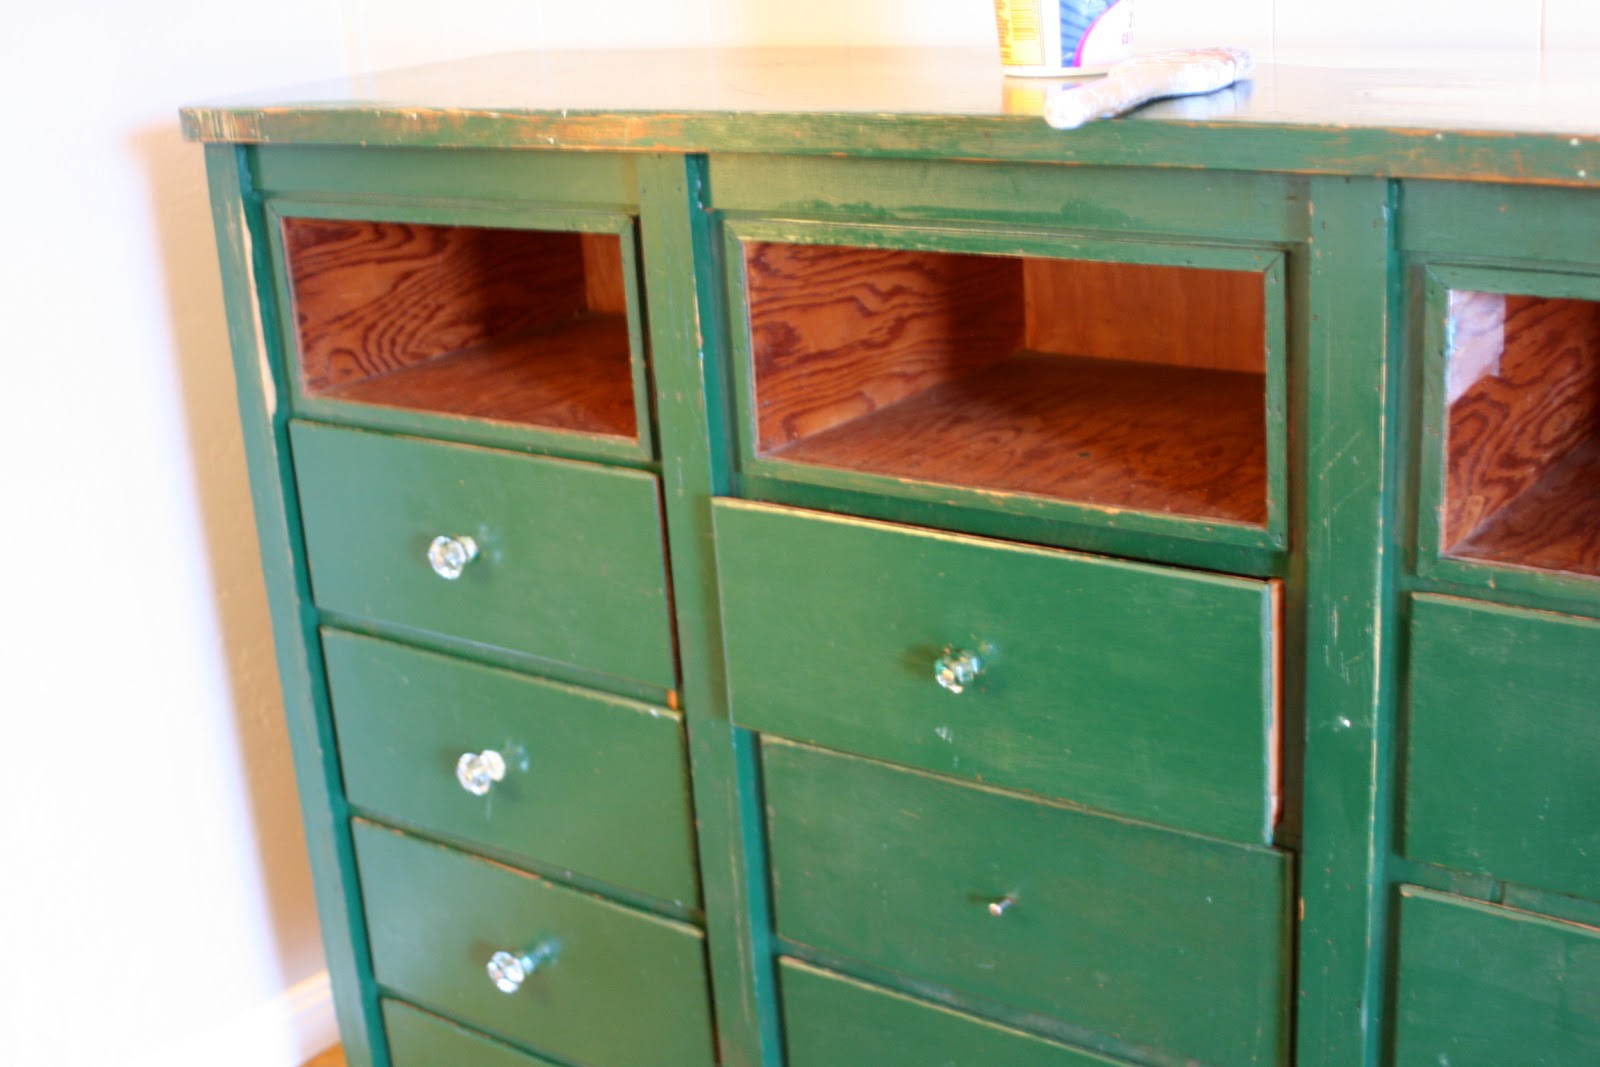
There are ups and downs to living in a college town. For instance, Craigslist is always picked over which means getting your hands on a real craigslist treasure is hard to do without paying well over the list price. Also, the furniture section is a constantly rotating selection of  saggy threadbare sofas and particle board desks. But there are up's too...Sometimes you are able to score an amazing piece of cabinetry that is not only nearly free but also holds some of our college town's history.
Behold...
Complete with high gloss hunter green paint, a suspicious smelling drawer and 11 unmatched antique glass knobs...stunning isn't she!

As soon as I saw the blurry photo of her on Craigslist I called my husband and told him it had to be mine, and he had to pick it up on his way home from work. The gal he got it from said it had been in her family for a long time but she had no idea where it came from.
Once it was home I started cleaning and cleaning and cleaning that's when I discovered the little brass plaque on the side that said 'Cal Humboldt' with an inventory #. This bedraggled beauty had been a part of a college laboratory, and I even remembered seeing something similar in one of the geology labs. Judging by the construction I think it is from the late 20's or early 30's. The unmatched glass knobs and streaky green color had been added later by the mother of the woman we purchased it from.
 
Out came my old fashion Milk Paint in Snow White and I set to work with a vision 
(one my hubby had trouble seeing!)
As many of you know milk paint does not require primer, but I did lightly sand this high gloss piece and then wipe it down with TSP substitute. I painted 3 thin coats of milk paint sanding lightly between each coat, as I wanted to build up the paint for a more durable finish. After painting, sanding and distressing I waxed the piece with an old T shirt and Trewax furniture wax.

For the hardware I chose to re-use most of the beautiful antique glass knobs, but for the top 3 drawers I used some antique chrome bin pulls my mother in law gave me a few years back. I love the way the chrome bin pulls remind me of it's collegiate past while the sparkly glass knobs add a little pop of contrast.

I love the way the piece looks weathered and funky without looking too contrived. The former green color peeks through the white paint in just enough places and the soft focus quality of the milk paint really add a much needed texture to my living room.

I get such a kick telling people that my husband and I share an alma mater with this chest, and since we do not display diplomas around here it's a great reminder of the the musty classrooms and labs we spent years in!
Sharing at:
 Furniture Feature Friday
& rollerskates!

Friday, July 1, 2011

Good morning my lovely friends, How is everyone today?
I'm certainly doing better, now that I've gotten in contact with a blog designer and will soon have a fancy schmancy new blog!
Our weather has been gorgeous the last few days and I am so energized by it that I'm tackling all sorts of projects. 
Yesterday I started sanding this desk I got for free from my neighbor

 yeah it certainly does not look like much now but it's sturdy and will work out great for the boys room. which reminds me as soon as I get the mountain of donation toys and clothing dealt with I'll finally show you the room.


All with the help of my trusty bat wielding sidekick!


I cannot wait to get my house back in order since I decided to clean out every closet and re arrange all my furniture this last week. 
I hope you all have a safe and happy 4th! I cannot believe Jess and I BOTH have the day off. we'll be BBQing on the back deck all day and I cannot wait!

Peace & Primer in my hair!


Tuesday, June 21, 2011

Our Summer Bucket List


Yesterday I mentioned that our family sat down and made a list of all the things we wanted to do this summer. I have seen a few really cute "bucket lists" out there on pinterest and I just knew I was going to have to make my own.
I started with this old flower picture form Ikea that a friend gave to me a while back.
All I did was remove the flower poster and paint the frame a nice dark blue. Then I flipped the flower picture (which I actually think is pretty cute) over and made my design on the back.
Using my silhouette and a few different fonts I cut out the lettering and glued them in place.
I wanted to be able to use this for a few years so I replaced the glass of the picture and just wrote our list on the glass with a dry erase marker. It would probably look a lot swankier if I used my silhouette to cut out the list too but then it would not be re-usable year after year, unless we do the same thing every year. Plus maybe next year I'll be able to get my oldest to write the list and then it will be that much cuter!


I was able to make this with just items I already had so it cost me nada, which I always love! The boys are already excited to get started checking things off the list, and so am I!
I am happy to say that we are currently visiting grandparents so I'll get to check that off as soon as we get back home.


Peace and prettier posters!

Friday, June 17, 2011

IF your Happy and You know it...

Thank a teacher! I know I am!
I was going to make Orion's teacher a gift anyhow but then I read the unbelievably sweet note she sent home for him about how special and wonderful he is (it made me cry!)
So then I knew I really had to make something special just for her...

I altered this canvas tote bag that I bought for $1.00 at Michael's by sewing the bottom corners flat. Then I added a little turquoise flower I made and stitched a real pearl into the center.
Next I cut out the phrase " If you're happy and You know it thank a teacher" using my new silhouette and some freezer paper. I simply ironed the freezer paper to the bag and painted the phrase.Then peeled the freezer paper off and filled my bag with some nice organic hand soap, and organic lotion, and a chocolate bar.
Orion and I each made a card ( I cried while filling mine out, I know I'm silly!) and I tucked the cards into the bag.


Today is the last day of school which they call "Dance Day" All the kids, teachers, and parents dance their booty's off on the playground and each class even practices a special dance to preform in front of everyone else. Orion's class is doing the "Boogie Walk," seriously, how cute is that?
We are off to our very last day of kindergarten,  Hooray Summer!

Peace don't laugh at my dance skills!


Ladybird Ln


Wednesday, June 8, 2011

Adventures in budget renovations- Copper Counter tops

As I mentioned yesterday I have had A LOT of emails recently about my counter tops. So today I wanted to share a little bit about them, the up and the downs.
We did our counters all by ourselves, but I am a  Jeweler/metal worker who already has all the tools and loads of experience working with metal. Not that you have to be a metal worker to do this but knowing a lot about working with copper made this project a lot easier for us.


I chose Copper counter tops because of their unique warmth and beauty. I'm just not the granite kind of gal, I hate cleaning tile grout, and we wanted a higher end finish than laminate. My husband and I had always admired the copper counters at one of our favorite coffee shops so we decided to look into copper. I started researching, and reading forums, and calling every metal supplier in my county. Here is a list of everything I feel is important to know about copper as a  kitchen surface. If you still feel like it's the right choice for you then stick around for my tutorial.


  • Copper has a "living" finish, which means that it is constantly oxidizing. Anything that comes in contact with the surface will leave it's mark. This gives the counter a mottled depth and lots of interest, it also looks kind of grungy. I love it but I also have to remove everything from the counter, scrub it down with a sponge and soapy water, and spray a light wax on it 1-2 times a week.
Here it is before I scrub and polish it, notice the "verdigris" green spots from water drops. The spots will come right off but see the ring from a glass over in the right corner, that will not polish out unless you use a heavier polish.

Here is that same spot after it has been cleaned and polished, it's really not much different except now it is shiny and the spots are gone, but all the residual marks are still there

Here is the same polished spot but shot from a different angle, see how clean and shiny it is despite that mottled surface marks
  • You can seal the tops but most clear coats will just scratch and peel off in the heavy use areas.
  • Copper is a soft metal so it may scratch and dent easily. Mine is still dent and scratch free but I am very careful not to drop things on it, drag things across it, etc..
  • If you do get a scratch you can sand it out but depending on the gauge (thickness) of the metal you may wear down the surface.
  • Copper has anti-microbial properties, which you can read more about here, which is great for a kitchen
  • Copper is currently much more expensive that it has ever been. For (2) 3x5 sheets of 16oz copper we paid almost $500! This was for industrial grade copper, which means that it may not be scratch/dent free.I purchased mine from a roofing company, and the man who sold it to me told me I could not make a decent surface with it (which I just took as a challenge) and he tried very hard to talk me out of using 16oz copper.
  • Ideally for a surface you would use 20 oz. Copper. All I could get a hold of was 16 oz. and my counter turned out flawless but it wasn't easy. Basically what it means it that for every square foot there is 16 oz (or 1lb.) of copper, this makes it about a 24 gauge. It is thin enough to bend with your hands but too thick to cut nicely with tin snips.
  • We laminated our copper to mdf using a specialized glue called TC-20. This is the most important part and is what makes your surface feel solid. We chose to use 3/4" mdf over 1/2" plywood for the under layers of the counter. Stay tuned for a tutorial. We ordered the glue from this company, it is not expensive but you do have to order it and wait for it to come so order more than you think you need. you could use epoxy or contruction adhesive but this product is by far the easiest to work with. It is VOC free, cleans up with water, and is relatively cheap.
  • If you have an L shape or corner of length longer than the sheet in your kitchen you will have to consider how you will resolve the seam. You can have the seam braised but it may warp the the sheets and make it impossible to glue down. We chose to make our seam by laying 2 perfectly straight edges up against each other and then fill the crack with a copper epoxy. Yes you can see the seam, no it does not bother me. Truthfully I hardly even notice it, and the epoxy is holding up really well. To me it was much more important that my surface be perfectly flat and fully glued to the mdf than having an invisible seam. 
Here is the seam the day we layed the copper onto the MDF. 
Notice how "new penny" the surface looks
here is that same seam today, it is noticeable but just barely. 
Notice how "old penny" it looks now
  • When you first lay the copper it will be bright and shiny like a new penny, it will quickly turn to old penny. If you do not like the way an old penny looks then this is not the surface for you. It will never stay bright and shiny and perfect looking. It is very important to understand this. If you are not sure how you would feel about it go down to the hardware store and buy a small sheet of copper from the K&S stand. Take the little sheet home wash it with soap and a scrubby and set it out in your kitchen, maybe near your sink. Rub your hands on it, put a slice of lemon on it, get it wet and do a few experiments to see how it oxidizes in your home. If after a few weeks you still like it then go for it!
  • There are a lot of products you can use to clean and wax your counter tops. I tried all of them. For the first 6 months I tried something different nearly every week. To get your surface back to the bright shiny raw state it was when you laid it take half a lemon dip it in salt and rub it on the surface. It will eat away the oxidation instantly. You can then rinse it with water and bam it's brand new again. this is good to do if you get a mark that you really don't like, I do not recommended that you do this more than twice a year. If you do not wax the metal it will darken within a day or so. If you do wax it it will still darken just much slower.
  •  I do not like to use heavy wax like a car wax because it leaves a buildup that you then have to scrub off, yuck! I like to clean the surface with a warm soapy sponge then I towel dry it and apply a light multi-surface wax. 
This one said it could be used on wood, granite, or stainless so I figured Copper was somewhere in between those.

I have said it a few times and I feel like I need to say it again. Copper counter tops are not for everyone! I love them and I am okay with cleaning them constantly but there are still days when I feel like we should have gone a different way. I have had a lot of really nice complements on them but I have also had a lot of negative ones, including a few from a real estate agent about the resale value of installing copper surfaces :(
This was one of our splurges in our kitchen. It is a high end finish for a reason, we were able to DIY them for about a third of the cost of having them installed but it was a ton of work and stress and problem solving.
I hope that answers a lot of your questions, and feel free to keep asking. I will try to get the tutorial up tomorrow so come on back if they are still a surface you'd be interested in.

Peace and pennies from heaven!


Monday, May 9, 2011

Cake Carrier Lamp

A few weeks ago I posted about my cake carrier lamp I made for my guest room/ studio space. Today I thought I'd show you how I put it all together. Actually it was alarmingly easy ( I say alarming because most of the time my hair brained schemes are a lot more work) 
I found my cake carrier for FREE at a yard sale but I have seen similar things on thrift shops and most certainly ebay.
As badly as I wanted to turn this into a lamp I had a big problem, the inside of the cake carrier is also bright yellow and when I placed it over an exsisting lamp the light it put out could only be described as "Bug Light" yellow, not what I had in mind for a bedside reading lamp. Husband said I should paint the inside, (NO way!) the bright yellow is the best part! I had to come up with another option, so I decided to try making a lamp with 2 lampshades, an inner white one, and my beloved cake carrier top.

Initial I wanted to find a lamp base at a thrift store but I was having trouble finding something that would work for the size of the cake carrier

So I caved and bought this new one on clearance at Target, totally not my style but hey it was only $8!

First thing I did was remove the, ummm...graphic print pattern from the shade as my kitty looked wistfully out the window. 
Her name is Meetu, because her personality as a little sister cat is "Me Too!"
Whoa, tangent!

Anyways, because the shade was 10" tall and I needed it to be 6"  I removed the vinyl, cut a 4" strip off and  hot glued the vinyl shade back onto the wire lamp shade things.

Then I covered the rebuilt lampshade in a light white fabric

 I painted the base of the lamp with the perfectly matching yellow spray paint I already had. How lucky is that?!
then with just a few glue dots i adheared the top of the cake carrier to the top of the lamp shade, clicked on the light and fell in love!

Here you can see the white shade underneath the top of the cake carrier.

since I did not alter the actual carrier I can always dismantle my lamp and still have a vintage cake carrier to use.


Bright Yellow Peace!

Wednesday, April 6, 2011

Make a Pillow without measuring


Today I made this beautiful floral pillow, without even measuring!
wanna know how...?

I used a placemat! 
I love placemats, but with 2 little boys I never use cloth ones, cause I'd be washing them after each use!
I found these a while back on clearance at target and fell in love with the print. I also bought the coordinating napkins, which will either become large square pillows or basket liners.

Now because these palcemats have a backing you could just snip a little hole and fill it with pillow fluff and be done but I wanted these to match with the rest of my pillows so I chose to back them with my favorite tan ticking from Jo-ann's fabric.

So here's how you do it with out measuring, because sometimes placemats are just a little crooked and it's just a lot easier this way. 
Lay the placemat on top of your ironed backing fabric wrong sides together. Leaving about an inch all the way around, cut out your backing

Fold backing fabric over the top of the placemat and lightly iron to mark where your seam will be. Lift up the edge of the placemat and fold it back then fold the backing over itself and iron a nice crease. repeat on the other 3 sides, and don't forget to fold the corners to 45 degree angles.
with all your edges creased your backing should be the same exact size as your placemat and all ready to sew.

Sew about 1/2" in from the edge to make a flanged pillow leaving a hole the size of your hand at the bottom to fill the pillow. Fill with desired pillow fluff and sew the hole closed either by hand or carefully on your sewing machine (like I do).

toss the pillow on the couch you and enjoy!


Peace and clearance placemats!
Related Posts Plugin for WordPress, Blogger...