Friday, September 30, 2011

Green Beans with Garlic Dill Butter

Lately I have been trying to find new way to prepare our fresh green beans. There are about a million other ways to prepare them and personally I'm a big fan of oven roasted, but oven roasted takes time and makes a mess. Here is a delicious lite mess way to make some pretty fantastic green beans. They come out a delicious mix of crispy and tender and I only wish that I had more green beans so I could make it again tomorrow!
 
Green Beans With Garlic Dill Butter
fresh green beans 
1-2 cloves chopped fresh garlic 
1/4 tsp dried Dill
1-2 tbsp butter
salt and pepper to taste

*this is by no means an exact recipe. I love Butter & Garlic so I use lots, use less if you'd like : )

Add butter and green beans to a heavy bottomed skillet. Cover with a tight fitting lid and cook over medium heat for 5-7 minutes or until the green beans are starting to brown slightly. Toss the green beans around to coat with butter completely and allow to cook for 2-3 more minutes with the lid slightly tilted so some of the steam can escape. add garlic, dried dill, salt and pepper and allow to cook just until the garlic starts to brown.
Remove from heat and Enjoy!

pass the beans!

Tuesday, September 27, 2011

Book Fairy Costume


Last year I  decided I was going to be a diction-fairy for Halloween. I had been making book page wreaths for my winter boutique and this just kinda evolved out of hours spent with a glue gun and  rolled book pages. If you have made a book page wreath the this should be pretty simple. If you haven't made a book page wreath then it's still pretty easy just with a bit more reading. Rather than make a new one, I'm just breaking down how I made it last year so if it gets confusing just let me know!

Book Page Tutu
First take a scrap of fabric 3-4 inches wide and cut it to just a few inches longer than what you want the waist to be. You want just a few inches of overlap to make it easier to put on and so there is no gap in the back.

Next lay the strip of fabric out flat and begin gluing on the rolled papers in rows along your strip. I started with the bottom row and went up so the pages with lay out nicely. 
For each rolled up section of paper I used 2-3 pages together because dictionary pages are so thin. 
To make the paper rolls I like to do a mix of actually rolling the pages into cones/tubes

and mixing in a few more free formed paper rolls. Like this S shaped roll

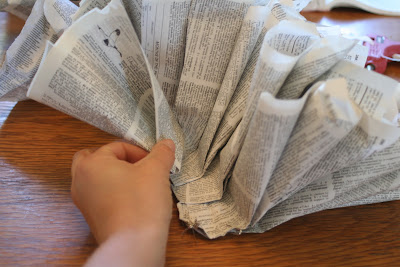
Make sure after you roll the pages that you fold the end before gluing so the rolls spring out like a tutu and not just lay flat.
To glue the roll down you will apply glue only to the folded part of the roll and then stick it down to the strip.
Continue rolling and gluing until the entire strip of fabric is covered except for  a few inches at the end. I did 3 layers of rolled papers but for fuller tutu you could continue to add layers.
here's the 1st/ bottom layer

2nd /middle layer and you can see the top layer folded over to the side

and here's the finished tutu. Once I had the top layer all glued down I  went along the top edge and trimmed along the strip of fabric so I would have a nice straight edge. I like the raw edge look of it this way but this year I might go back and add some ribbon along the top edge to make for a more finished look.


At the end you could either attach the tutu with safety pins or fold the ends over and add a cute ribbon to tie the tutu with. Last year I did saftey pins and they worked out fine, this year I want  to go back and add the ties to make it easier to take on and off. 
Also if you are making this for a child you would want to maybe do the ties so there is no fear of poking with the pins. 


Dictionary Fairy Wings


First you remove the entire cover from the dictionary. 


I wanted fairly rigid wings that would not flap around as I walked so I took a piece of  scrap wire from my garage ( you could use a wire hanger) and bent it slightly then hot glued it to the inside of my wings. 

next to cover the wire and add some interest I glued several fanned out pages to the inside of the cover.

Near the top of the center binding I punched 2 holes and strung a large rubber band through to use as straps to wear the wings. You could certainly use ribbon here and even leave the ends long so they flutter behind you as you walk. I think that is what I'll be doing for this year!

here's what you can see of the rubber band as you wear the wings. The large rubber band made for a very comfortable fit last year but honestly I'm not sure where this gigantic band came from.
This year I will be wearing this again but I am hoping to go back and re-vamp it a little and maybe even make myself a paper corset or paper wig to wear with it. What ever I do, I promise I will not wait until the last second! 
Hope this tutorial is inspirational for all the amazing things you can do with paper! All together this costume cost me only about 10 hot glue sticks, 1 thrift store dictionary (50 cents) and about 2 hours to put it all together.
If you decide to make an outfit please share your photos!

Ladybird Ln


Visit thecsiproject.comPhotobucket

”Join


 & paper cuts

Monday, September 26, 2011

The depot

Well... I was hoping to get my tutorial up for the book fairy costume but someone's daddy was given an entire box of Thomas the Train stuff  from a coworker. 


Needless to say, pretty much everyone was entirely too busy building tracks and driving trains this weekend to get much else done!

Honestly, there must be at least a half mile of track running through my house. The excited squeals and giggles out of my little guys definitely makes hardly being able to walk around worth it!

Well I better run, my train is here! 
I'll be back tomorrow with the book fairy tutu how to, phew that's a tongue twister!


& railroad crossings!


Friday, September 23, 2011

Falling beautifully


Sometimes you look out your window and realize that the world we live in really is magic. 
This morning while getting dressed I looked out the window to see a fallen leaf perfectly captured by a spiderweb string. 

The leaf magically danced and spun in the wind hanging by a single silken thread.

These are the moments that cannot be staged or made by anyone other than the supreme perfectionist, nature. 

Completely random congruity is the only explanation.


Floating perfectly at eye level as I feverishly snapped photos. Then the breeze picked up, and then just as effortlessly as it apparated the string broke and the leaf drifted slowly to the ground.

There is something inexplicably mystical to behold such a fleeting miracle.
Nature is the ultimate installation artist!


 go outside and enjoy!

Life is what you make it {pt.1}

So why not make as much of your life as you can? 
When we began remodeling our first and current home we decided to use as many re-purposed items as possible and to hand make as much of it as possible. So far I'd say we've really done great rethinking traditional products on new applications. We have made our own light fixtures, counter tops, floors,cabinets, furniture, and so much more.
For nearly 3 years I have wanted to diy a chandelier for our dining room. Believe me when I say that the current one isn't really as bad as it could be but it has just never fit in the style of our home and certainly doesn't make a statement. I have been looking for one of those ugly old 80"s light fixtures for about 2 years and just last week we were able to get one off craigslist. Seriously, I waited 2 years for this...


Yep, 2 years! I know, I know it looks like it needs to go back from whence it came but after removing the ummm...interesting glass shade I was left with this...  

It's a little better anyhow! More importantly, it has loads of potential. There are so many many things I could do with it from here but I've had my heart set on 1 light fixture and 1 light fixture only for ages...


Something between this and this, both over a grand, and both from restoration hardware. I had seen a few other bloggers make similar chandeliers using laminate edge banding so off I went to the hardware store and bought 65 ft of adhesive backed oak veneer edging.


 Because the veneer is so thin and because I did not want to have to look at the bumpy surface of the adhesive I decided to iron 2 strips back to back in order to have a sturdier and better looking hoops. But, in order to have nice smooth round hoops I needed to iron them together in the circular shape and size they needed to be. Just ironing them together on a flat surface makes it so they cannot bend with out the inner strip buckling. I could find lots of things the same size as I wanted my hoops but none of them would be able to withstand the heat from my iron. Lucky for me my man is a homebrewer so out to the garage I went to drag back his giant 10 gallon keg. All I had to do was lay the strips back to back and secure them with tape to the keg. After the first one it only took me about 20 minutes to do the other 5 hoops.

Carefully I ironed the strips together without joining the ends (so I could remove them from said keg). Once removed, I double checked the circumference of my hoops and secured the ends, turning them into rings. 

As I mad the rings I would configure the piece to make sure they fit properly

The final piece will be similar to this, but with a lamp inside...I think

After lightly sanding the edges of the rings I prepped the lamp and the rings for paint. Initially I had planned on staining the rings a dark brown and painting the lamp black but after really thinking about it I decided to paint the entire thing black.  
Today I will finish the painting and see if I can get the whole thing put together without an extra set of hands. We are also re-staining our deck this weekend so the Mr. has sworn off any of my projects until the deck is finished. I am hoping to have it up by next week so I can include it into my Halloween decorating, we'll see!

Speaking of Halloween, My Diction-fairy costume from last year has been getting a lot of love on Pinterest so I thought I'd show all of you how you can make your own. with just a glue gun and an old dictionary you can fashion a super cute and unique costume so make sure you come back for that.


Is dining under good light!

Monday, September 19, 2011

Ruffle Skirt


We are home from our trip to Long Beach and our stay on the Queen Mary. While it will take me a few days to edit all the photos of the traditional Cambodian wedding we attended I thought I'd show you the skirt I made for the first day of the ceremony. I made the skirt by using this tutorial from No Big Dill for the cutesy coastal skirt. The only difference is that I decided not to add in an elastic waistband as recommended in her tutorial. The fabric is so nice and stretchy that I decided it would be more comfortable and have a better silhouette if there were no waistband.


The bow of the Queen Mary makes for a perfect photo shoot of my pale gams!


I ordered my fabric from Rufflefabric.com for $20 a yard. I purchased 2 yards but really you only use 1 so in total the skirt only cost me $20!  I received so many complements, however my favorite comment by far was when a Cambodian woman walking by the ceremony told me I looked like a very fancy princess, but my skirt should be a different color. When I told her I made it this way she said "it very pretty, next time you make different color, okay?" then she kept walking. You might think I'd be offended but it was totally worth the laugh!


With only 1 seam the skirt could not have been any easier to make! The best part is that it is not only very comfortable fabric but you can also just wad it up and stuff it in your suitcase, so it is even perfect for traveling! Since I have fabric left over I'm thinking about making a few big ruffly pillows for our bed. And speaking of our bed I'm headed back to it to decompress from 4 very busy and culturally overstimulating days of music, food, incense, city driving, and ceremony!

&  Pink Ruffles!


Wednesday, September 14, 2011


Before we head out of town for a few days I thought I'd show you my September arrangement for my diy'd pottery barn shelves. As I have said many times I love to re-arrange my junk according to the seasons. I do not have much clutter in my home so I really like to use these shelves to display my treasures. I'll probably decorate for Halloween here in a week or two so this arrangement is very temporary...Yay Halloween!


via Pinterest

The cork "C" and the painting on the bottom are both inspired by pintrest pictures. The little nest painting was the outcome of my doodling with paint rather than art journaling the other day. I love how the colors of the paintings just blend right in with all my other items. The fall always makes me feel like nesting so I thought I'd translate that literally into my September display. I also fashioned a few little nests out of spanish moss from the dollar store and placed those in mini  apple crates. In other places around our home I have hung fall wreaths and placed baskets of blankets and pillows. What things are you beginning to rearrange in your home as our days get shorter and our nights get cooler?

Well I better run, I have so much to do before we leave. I'll be back soon with pictures to share!


& pumpkin spice candles!

Monday, September 12, 2011

Falling into autumn

Although September is usually our warmest month here in Humboldt county, I cannot help but look forward to autumn. I love how things always seem to settle back down from the hectic summer pace. We are all still struggling to get used to our new school schedules and my youngest, Mason, is still having a hard time being away from mommy and going to Montessori 2 days a week. Luckily, Orion loves his new school, and at only 104 students he is getting to know all his school mates pretty fast.  
We are leaving Wednesday to head to southern California to be part of a 3 day traditional Cambodian wedding. While I am definitely not looking forward to driving to the other end of the state for the second time in a month I am so happy for our dear friends and cannot wait to share in their celebration. I have never been to a Cambodian wedding and am really looking forward to all of it. We will be staying on the Queen Mary which neither my husband or I have ever done.
Summer is certainly coming to a close and there are still many things left undone on our bucket list. While we got to do so many fun things it seems the small things managed to get away from us, I feel guilty for not getting around playing board games and certainly for not volunteering.  Perhaps, We will have to devote our last few weeks of summer to those 6 undone things. 
Yep, still a lot to do!

We have been working feverishly in our yard and last few weekends and that wonderful hubby of mine removed the (and I'm not kidding you) 30 ft. tall bush in our back yard. This bush was not only taller than our house it was also the entire length of it and about 10ft. wide! What was once planted to provide a little privacy was already ridiculously over grown when we bought our home almost 3 years ago. 3 years of procrastination later we have gained back about a third of our yard! 
It looks small in this pic but really it is about 10 ft. by 24 ft!

Removing the mammoth hedge was really just the first step, now there is an entire side of our home (that of course faces the street) that has been neglected all this time. It's not pretty! So now the plan  for the reclaimed space is to build a woodshed, a taller and more private fence, and maybe even a dedicated chicken yard.

Anyone else tackle a very overwhelming can of worms lately?


& pardon my naked house!

Friday, September 2, 2011

Mamma's little bento!


Wanna know a secret...? I hate Ziploc bags! Yep I can't stand them, I mean I keep a few in my house because some things are just zip necessary, but overall any single use packaging really angers me. Wanna know something else, I also dislike paper towels! I refuse to but them and my husband loves them so he makes special trips to the store just to buy paper towels, it's pretty comical really.
That's why when I was planning our upcoming school year I decided that all school lunches coming from this house would be waste free. Last year I made a few attempts to keep Orion's lunches waste free but the tupperware I was sending with him never seemed to make it back home in his lunchbox.
After a lot of  internet researching I decided that the best bento lunch system for us would be Laptop lunches. The box was a good size and seemed to be well made, plus the individual sealing containers meant that I could send messy stuff along too.  The thing I didn't like about laptop lunches was the price tag $40 plus dollars for plastic, Yikes! Luckily for me I was able to find a brand spankin' new one on ebay for half the price. The system even comes with the cutest little fork and spoon and a "users guide" which is mostly about living a waste free and organic lifestyle. Maybe the best part of the whole thing is that Orion loves it and feels really special as he is the kid at school who has the coolest lunch, maybe that's why he is eating all of it, I dunno. Either way I am getting to express my love and creativity by packing an ecologically sensible lunch which is also super healthy, Jackpot!

We are just wrapping up our first week of bento lunches and I couldn't be more excited to tell you that the boy who hardly ever ate his lunch last year has brought home an empty lunch box every day! (well, except for the 1 bite of something he saves for his little brother, seriously, how sweet is that?)
While it does take a bit longer to pack his lunch I am finding that I really enjoy trying to make each lunch special. There are so many great resources for bento ideas but I have found that the laptop lunches Menu library page  offers all sort of great seasonal ideas. 

Here's what was on the menu this week:

Monday
Star quesadillas, Black bean salsa, tortilla chips, mixed fruit & banana chips

Tuesday
Peanut butter banana wraps, grapes, cottage cheese w/ strawberries, cheese pac-man w/ cucumber ghosties & pretzels

Wednesday
pb&j, egg man, strangely long tomatoes, an aussie apple* and a V-8 (the boy loves V-8!)
Someone may have forgotten to put the lid back onto his cottage cheese after eating so his regular bento box was in the wash but no worries glad ware works fine for bento-ing too!


Thursday
Mini salami & cheese sandwiches, cherry tomatoes, grapes, banana, pretzels & black berry yogurt with a few frozen blackberries thrown in to keep it cold

Friday
The other half of that cheese and salami sandwich from thursday, dried cranberries, asain rice cracker mix, tomato and cucumber salad w/ black sesame seeds, a banana and 2 frosted molasses cookies

* The aussie apple is a super cool way of sending a cut up apple to school with no baggie. Simply cut the apple into 4 pieces, put them back onto the core and place a clean rubber band around the belly of the apple. The apple stays fresh and crunchy until it's time to eat.

I hope this inspires a few of you to try out a less waste lifestyle for your little ones lunches. Next friday I'll show a few of the everyday items I use as tools for crafting a fun lunch!

is a  cheesy pac-man!
Related Posts Plugin for WordPress, Blogger...