Showing posts with label tutorials. Show all posts

Tuesday, September 27, 2011

Book Fairy Costume


Last year I  decided I was going to be a diction-fairy for Halloween. I had been making book page wreaths for my winter boutique and this just kinda evolved out of hours spent with a glue gun and  rolled book pages. If you have made a book page wreath the this should be pretty simple. If you haven't made a book page wreath then it's still pretty easy just with a bit more reading. Rather than make a new one, I'm just breaking down how I made it last year so if it gets confusing just let me know!

Book Page Tutu
First take a scrap of fabric 3-4 inches wide and cut it to just a few inches longer than what you want the waist to be. You want just a few inches of overlap to make it easier to put on and so there is no gap in the back.

Next lay the strip of fabric out flat and begin gluing on the rolled papers in rows along your strip. I started with the bottom row and went up so the pages with lay out nicely. 
For each rolled up section of paper I used 2-3 pages together because dictionary pages are so thin. 
To make the paper rolls I like to do a mix of actually rolling the pages into cones/tubes

and mixing in a few more free formed paper rolls. Like this S shaped roll

Make sure after you roll the pages that you fold the end before gluing so the rolls spring out like a tutu and not just lay flat.
To glue the roll down you will apply glue only to the folded part of the roll and then stick it down to the strip.
Continue rolling and gluing until the entire strip of fabric is covered except for  a few inches at the end. I did 3 layers of rolled papers but for fuller tutu you could continue to add layers.
here's the 1st/ bottom layer

2nd /middle layer and you can see the top layer folded over to the side

and here's the finished tutu. Once I had the top layer all glued down I  went along the top edge and trimmed along the strip of fabric so I would have a nice straight edge. I like the raw edge look of it this way but this year I might go back and add some ribbon along the top edge to make for a more finished look.


At the end you could either attach the tutu with safety pins or fold the ends over and add a cute ribbon to tie the tutu with. Last year I did saftey pins and they worked out fine, this year I want  to go back and add the ties to make it easier to take on and off. 
Also if you are making this for a child you would want to maybe do the ties so there is no fear of poking with the pins. 


Dictionary Fairy Wings


First you remove the entire cover from the dictionary. 


I wanted fairly rigid wings that would not flap around as I walked so I took a piece of  scrap wire from my garage ( you could use a wire hanger) and bent it slightly then hot glued it to the inside of my wings. 

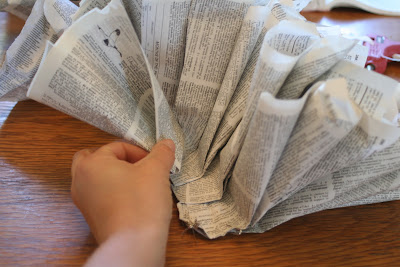
next to cover the wire and add some interest I glued several fanned out pages to the inside of the cover.

Near the top of the center binding I punched 2 holes and strung a large rubber band through to use as straps to wear the wings. You could certainly use ribbon here and even leave the ends long so they flutter behind you as you walk. I think that is what I'll be doing for this year!

here's what you can see of the rubber band as you wear the wings. The large rubber band made for a very comfortable fit last year but honestly I'm not sure where this gigantic band came from.
This year I will be wearing this again but I am hoping to go back and re-vamp it a little and maybe even make myself a paper corset or paper wig to wear with it. What ever I do, I promise I will not wait until the last second! 
Hope this tutorial is inspirational for all the amazing things you can do with paper! All together this costume cost me only about 10 hot glue sticks, 1 thrift store dictionary (50 cents) and about 2 hours to put it all together.
If you decide to make an outfit please share your photos!

Ladybird Ln


Visit thecsiproject.comPhotobucket

”Join


 & paper cuts

Wednesday, June 29, 2011

*Remodelaholic*


Hi Everybody, I'm being Featured over at Remodelaholic today!
I'm so happy that Cassity invited me over for the day, I hope you stop by too!

Peace & New Friends!

Friday, June 10, 2011

DIY Copper Countertops

As I mentioned in this post a few days ago and this post from a long time ago we fabricated and installed our copper counter tops ourselves. Before ordering our supplies I frequented this garden web forum. It is a long thread but if you are really considering copper surfacesI suggest you read it. There are a few really great tutorials on there and the last one is pretty much the way we did it.
The whole process is very similar to applying a regular laminate. Basically you are just taking this very thin sheet of copper and laminating it to a stronger base.
As I said previously we used 16oz copper roofing material instead of the recommended 20oz sheeting. We were just very careful not to dent or bend it and it worked out fine. we transported it from the supplier to  ourhome sandwiched flat between 2 sheets of plywood instead or the recommended method or rolling it up, cause that's just stupid!
We started by removing all the previous plywood all the way down to the cabinets because the exsisting counter was not level and the plywood had extensive water damage. If your surface is level and in good condition you can just lay the mdf right on top of it. I have heard of people laying the copper on top of laminate but I do not recommend it because the glue is designed to soak into the mdf which it obviously could not do on laminate.


Next we cut sheets of 1/2" plywood and screwed it to the  the top of the base cabinets. On top of the plywood we placed the sheets of 3/4" mdf.   At the corner of the L shape we used  miter bolts in holes we routered out from underneath to join the 2 sections securely.
something like this
To secure the mdf to the plywood we applied construction adhesive in between the plywood layer and the mdf layer and then screwed them together from underneath (ie, inside the cabinets up into the plywood and mdf) But we did not do this until after the copper had been applied, so that we could easily slide the entire unit out to clamp the front edge. confusing I know but stick with me.

For the edges we screwed oak boards into the mdf and plywood  before applying the copper sheeting. Mdf is relatively soft and will dent easier than oak will. This is a pretty standard way of doing edges when applying regular laminate. After screwing the oak boards to the sides we then filled and sanded the holes perfectly smooth so they would not show under the thin layer of copper.
We decided to apply the copper to the sides before putting the top on to avoid having the seam on top. If you have access to or would like to make a sheet metal brake then you can just bend it to a 90 angle and glue it down. I however did not want a rounded edge, but there are a few tutorials around if that's the way you want to go.
We cut strips from our large sheets of copper with a dremel in our garage. This step takes forever but makes a perfect cut without warping the copper as shears would. Simply lay the sheet out with a board underneath to elevate it a bit. then mark your line, put goggles on, and patiently cut along your line. Cut your strip about a quarter inch wider than you need so it can be filed down to fit perfectly after it is put in place.
Prep your surfaces by lightly sanding the back of the copper and cleaning both the oak edge and the copper with rubbing alcohol.

This is the ONLY adhesive I would use, it's worth the money, cleans up with water, is VOC free and has a long working time. You can order it several places but I purchased mine and a glue roller here.
Follow the directions on the glue and apply glue to the back of the copper and oak edge and tape into place.

(See how the entire thing is scooted out a bit so we can clamp to the back edge. later we glued and screwed the mdf to the plywood.)

It is best to have a few sets of hands to quickly clamp the edge. The glue allows quite a bit of working time, but I do recommend cleaning up any that squeezes out with a damp towel while it is still wet. As you can tell we used A LOT of clamps, the more the better! We placed another board over the copper before clamping so they would not mar the copper.
Allow the edges to dry overnight before removing the clamps. Once dry, file and sand the top edge flush with the mdf layer. The copper top will go over this so it is important that it is perfectly flat and smooth.

Next we cut the sheets to just a bit larger than what we wanted our finished size to be.We used the factory edge of the copper for the front and placed our cut edge in the back, this is only important if you are doing a "L" shape or long span and have to have a seam on the top. Ideally you want to mate the 2 factory edges together to make a perfect seam. 

Notice in the picture above that we had already cut out the sink hole out of  the mdf sub-layer. Do this, but wait to cut the sink hole in the copper until after it is glued down.


Prep the back of the copper and the top of the mdf by lightly sanding the copper and cleaning both with rubbing alcohol. We had an "L" shape so we chose to lay 1 segment at a time.

Apply the glue with a roller CAFEFULLY and lay down the copper. Smooth out all air bubbles and cover with another sheet of mdf. You will do this so that the pressure from the clamps is evenly distributed and that the clamps do not mar the surface. 

Here is a general idea of how it should be laid out so that the seam will be on the edge and not on the top. Pretty snazzy sketch huh?

This ridiculous picture is because we figured that the more weight and pressure we applied the less air bubbles we might get. So we placed just about every portable heavy object in our home on top of the mdf. It worked too because there are no air pockets under the copper. Also we did not apply too much weight on top of where the sink would be to avoid denting the copper that had no mdf underneath it.

After allowing the glue to dry overnight we removed the clamps, scooted the whole shebang back and into place and glued and screwed it to the plywood layer from underneath as I discussed earlier.
Next, file and sand so that the edge appears to be 1 solid piece. As I have mentioned before I'm a jeweler/ fabricator so this went fast and easy for me. Mostly you just need to make sure that the edges feel smooth and that there is no gap between the top layer and the edge, If there is then you can squish in some just for copper epoxy putty.
 I purchased mine at Ace hardware and followed the manufactures instructions for use. this is also what we used to fill the seam on the top of the counter. I simply smooshed it into the clean crack, waited for it to dry then sanded it flush.

here is what the finished edge looks like

See how it looks like 1 solid piece rather than 2 sheets butted together.

Here is the only outside corner. It looks like the corner is sharp but is is not at all sharp, it actually slightly rounded at the point. also notice the bit of oxidation on the bottom, it can easily be cleaned off with a scrubby.

Here is the only inside corner that also lines up with the only top seam. The white in the crack is a but of oxidation that I scrubbed off after I snapped this pic. 

In the end we are definitely happy with how we did the counter top but we had to do a lot of figuring and problem solving to make the other methods we had seen work best for our space. If you should choose to install a similar surface you will probably have to do a lot of your own adjusting to make it work for you.
It has been just over a year and I am happy to say that our counter still is scratch/ dent free with the exception of 1 small dent that came with the copper sheet. We have no air bubbles and still love the way it looks is our home. 
If you have any additional questions feel free to ask, I'm always glad to share and help.

Peace and a penny for your thoughts!


Monday, March 28, 2011

Silhouettes (the low tech way)

For my guest room/studio space I wanted to do silhouettes of my boys for a little pop. There are about a million ways to make silhouettes, here's how I did mine...

Silhouette Tutorial 

First start by taking a million profile shots of your subject, I put my boys in front of a very contrasty background and since I live where the sky is almost always foggy and white I just do it in front of our glass doors. 
Then upload your photos to your computer and go to you basic photo editing application, I use picasa, if you have it you could use photoshop, but then that's a whole different tutorial isn't it?
Once in you editing program crop your photo and turn the shadow scale all the way up until it looks all silhouette-ish like my darling boy there.

Print photos in black and white and cut, cut, cut
Once your silhouette is cut out lightly tape it to your cardstock.
I used the traditional black but they come out really fun if you use a brightly colored paper. I wanted to do mine in yellow but the Mr. didn't like the idea as much as I did.

Apply mod-podge or regular school glue to the back of your silhouette and place it on your background. I used those boards I painted to match my dresser.

smoosh (that's the technical term) out the wrinkles and bubbles. if it seems really wrinkly then place a sheet of wax paper over it and place it under a stack of books for a day or so to dry.

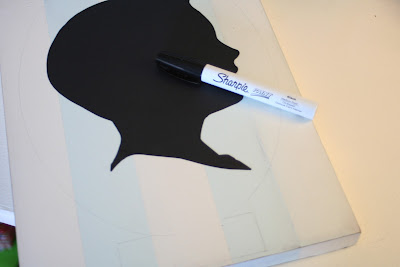
find something oval (because they are really hard to draw freehand!) and trace it onto your plaque


then with a sharpie paint marker, draw over your oval. I drew a little box on the bottom for a label too
I decided to write no. 1 &  no. 2 for my boys but you could always put their names or the date, whatever strikes your fancy! I might go back and add a little more embellishments to the oval, but I think I'll live with them for a while to decide what I want.

It may be low tech but it's still super cute!

Peace and paper scraps!
.

Thursday, March 24, 2011

My happy lamp


Isn't she wonderful? Here is my cake carrier I was asking you about the other day. even though it's a yucky gloomy day outside, I have a shiny little spot of happiness right here! I cannot believe how exactly the yellow spray paint (I had on hand!) matches the top and inside of my cake carrier! The Mr. thought it was gonna be a flop but even he admits that it came out pretty neat. 

And now for something completely different...

After posting my very favorite new stripey dresser I have had a few people ask exactly how to stripe a dresser. Since I was planning on doing a few matching art pieces for above the bed I figured I'd do a tutorial.

First you sand, clean and prime your piece. What ever color you prime with will show through a little when you distress the edges so prime with a contrasting color

After applying several coats of light blue paint mark off your stripes in pencil.
I find it works best to findand mark the center of your board and then measure out from there.
On my dresser I did 4" stripes but on these small boards I did 2" stripes

 Carefully tape your lines, tape just off the side of your pencil line that way you paint over the pencil leaving you nothing to have to go back and erase.

apply a few coats of white paint

Once the white paint is just dry remove the tape

 I like to lightly sand the entire piece smooth, then I go back and distress all the areas that would naturally distress with age like the the edges and all the raised areas
My panels have no raised areas but here is an example of the raised areas on the dresser.

So there is is let me know if you have any questions. 
Sorry it took me all week to get this up. My husbands darling Nana passed away this week so everything is a little behind. She was greatly loved and will be dearly missed...

Peace.

Tuesday, February 8, 2011

Kiddie Car Seat Covers


A few months ago we bought a new car, a car with very nice leather seats. 
My husband and I love the seats but the boys were having a harder time adjusting to the very slippery leather. each time Orion would jump out of the car his booster seat would come tumbling out after him. 
After looking around I still couldn't find anything affordable that would be both comfortable for the children and protect my seats from the little monsters. I wanted something fun, not blah grey and black, so I decided to make my own.

it just not my style, and they are $25 bucks each! 

So instead I made 2 of these

Piratey car seat protectors for my little mateys

Sorry about the cruddy pictures, the rain only stopped for a few minutes!

I simply took some freezer paper, laid it on the seat, and sketched out a rough shape and size for the covers. I made sure to note on my template where the head rest connected to the seat and where the LATCH carseat hooks were so I could anchor the covers to my seat. Then I took my template back in the house, and laid it out on my fabric. I wanted my seat protectors to be thick enough to absorb and spills but also be snuggly for Orion whose back sits against the seat. 


I suppouse you could use batting, but it wouldn't absorb much, so I sandwiched old towels in between my top fabric and the backing. I simply laid the fabrics right sides out, traced my template and sewed it all together. I cut away the excess material and pinned bias tape all aound the edges and sewed them together, just like quiltmaking.


the top of the covers

At the top I sewed button holes for the posts of the head rest to go through. We push our head rests down all the way, so I really  don't care what the button holes look like. This keeps the top of the cover in place and keeps the whole thing looking very tidy.

center ties

bottom ties (complete with non matching bias tape, I ran out of blue:) )

I also added ties at the center of the cover to tie to the LATCH seat components and I added ties to the bottom of the covers, which I tied up to a bar under the seat. None of the ties can be seen,  but they do need to be long enough to be easily tied and untied.


See the non matching bias tape disappears completely!

I backed my covers with a soft flannel but since they are not visible the backing isn't really necessary.

All together the car seat covers were about $10 in fabric, $5 in bias tape (cause I was too lazy to make my own that day), and an afternoon of ironing, pinning and sewing. They couldn't have been easier to make, and took hardly anytime to do. If you did not want to tie them at the bottom you could even add pockets for toys and books.

I love the way they turned out and how unique they are. Plus they wash nicely, stay in place perfectly, and look much more fun than the boring black polyester ones you can buy! I mean what's cooler than a starfish with a broadsword?


UndertheTableandDreaming

Join  us Saturdays at tatertotsandjello.com for the weekend wrap 
 up           party!
Hope on over to the Parties to see all the other fab stuff

Peace Me Mateys!


Related Posts Plugin for WordPress, Blogger...