


When Jess got home from work that night he learned that the kitchen reno had begun. let's just say that he was considerably less excited and optimistic about it than I was. Nevertheless, we had started down a long yet rewarding road. Here it is a year later and we are almost completely finished.
It had always been our dream to create our home with as many hand made items as possible. Our kitchen was our first dedicated project to our extreme diy goal. Now when I look at the almost finished project I am so proud that we stuck to our initial goal. which you can read all about here if you'd like. In all honesty the only aspect in which we deviated from our original plan was the budget. In the beginning we agreed to make our budget $500, which would basically only allow for cosmetic upgrades. Later Jess received a raise at work and we had a little more breathing room so we decided to expand our plans in a few important areas, like installing a dishwasher, that we just couldn't afford before.
Now I am happy to say that I am no longer ashamed of my kitchen. It is still a very small kitchen but it is at least a more efficient layout. I am sure the future owners will just come in and knock out the dividing walls and make it a much more open design, but that will be there 10-20k to spend, not mine. My kitchen is thoughtful, unique, handmade and most of all loved.
So do you wanna see how we did it all?
I have shown you my floor and my butcher-block counter top but admittedly I was not a great blogger then so just for fun I'm going to show you all over again over the next few weeks.
Today I want to show you how we made our kitchen lighting. My desire to hand-make all that I can really pushed this project. One day while grocery shopping I spotted some beautiful handmade vases in the floral department of Safeway.
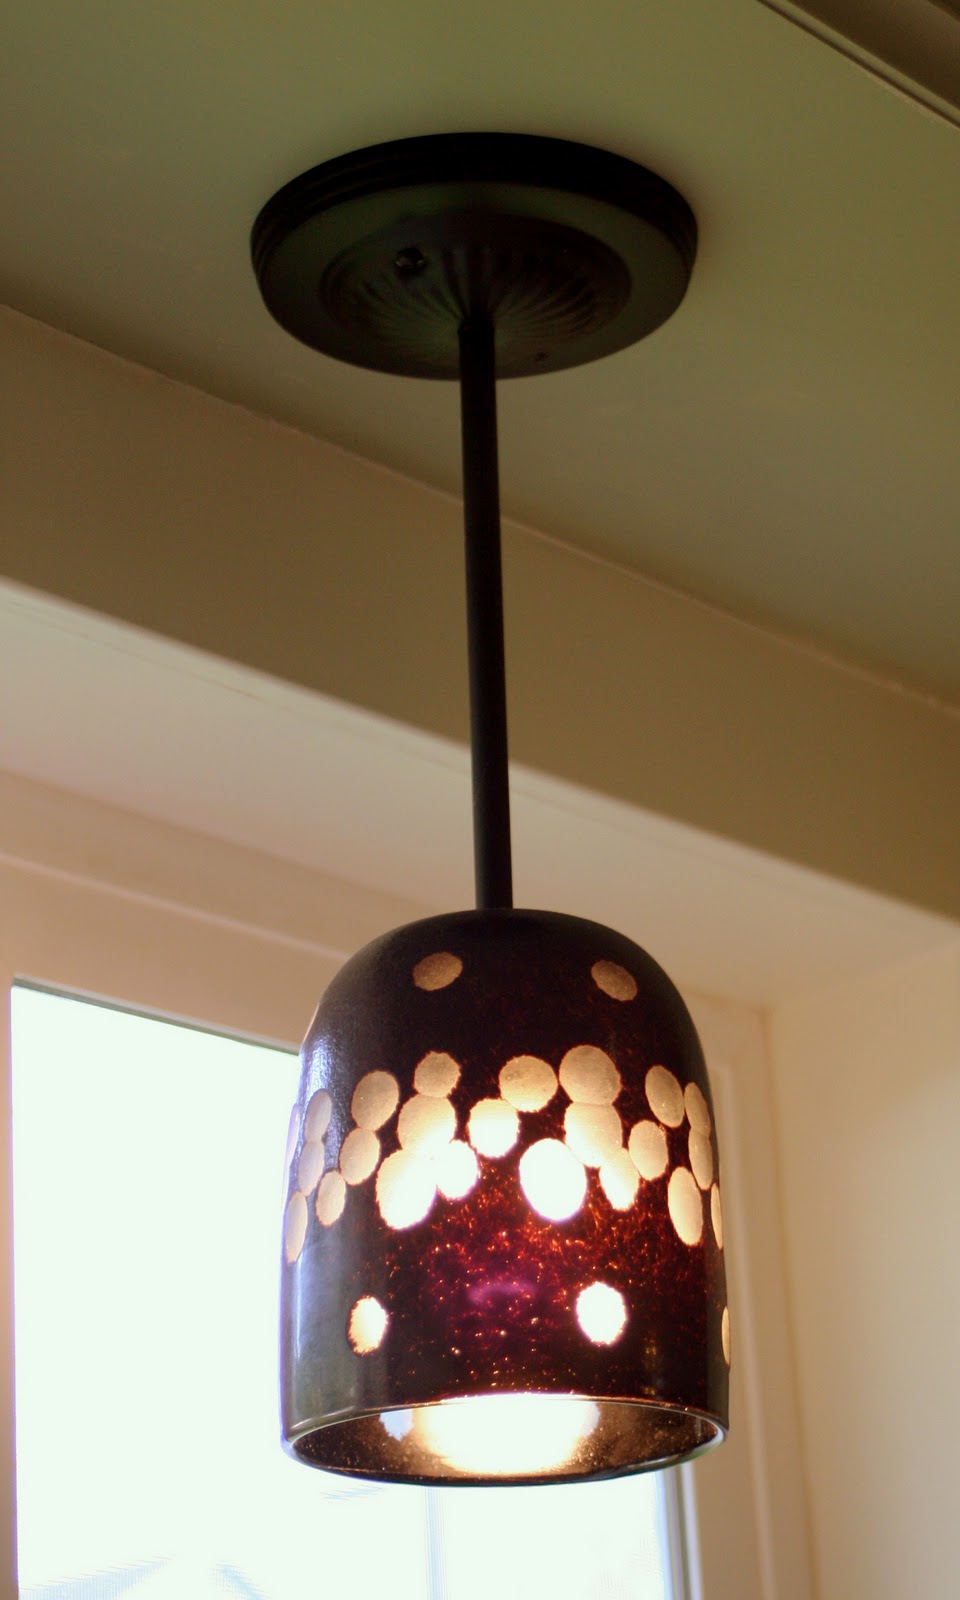
After a bit of internet searching on how to drill a hole in glass we attempted it, and it worked great. the next day I went back to safeway to buy the larger vases, and they were marked down on clearance! It was meant to be!
First we drilled the holes with a special glass drill bit under running water, we did ours in the sink so it would contain the glass just in case it broke
Next we took a trip to the hardware store's electrical section. there we purchased the part that attaches to the ceiling (I think it's called a canopy) a socket, and some electrical wire. Then we headed over to the K&S stand and bought a few feet of brass tubing.
Now I'm not even going to pretend that I did the wiring or even know anything about that, cause I don't. Jess put the entire thing together. I spray painted the tubing and canopy black and epoxied the glass
We made ourselves one of a kind kitchen lighting for wayyy less than we could ever have bought something similar. The best part is when someone new comes into the kitchen and asks where we got our beautiful pendants, I say Safeway, and they inevitably stare blankly at me until I explain it to them.

My small pendant fixture over the sink

the larger fixture over my antique wedgewood stove

I just adore the glow they give!
Heres the approxamate cost break down:
small vase-$9
2 Large vases- $ 16 each
1 Brass light canopy-$5
K&S brass tubing- $4 for each 9" stick
3 Light sockets-$ 4 each (we splurged for the good ones)
the epoxy and black spray paint we already had
= $70 for 2 very unique one of a kind light fixtures
Plus I like how masculine they seem and the way they give my old fashioned kitchen a modern twist!
I'm linking this up to the weekend wrap up party over at Tatertots & Jello
So hop on over there to check out all the other great projects.

Peace and pretty lighting!


I just love your pendants! So creative and unique!
ReplyDelete~Amanda
I love the looks of them, and that they're literally one-of-a-kind! I remember your posts about your kitchen floor and have pretty much been in love with your innovative determination since then :) Looking forward to your other kitchen highlights!
ReplyDeleteI really love this!! Great job!! Sharing on fb!
ReplyDeleteI actually am just coming back now, because after I posted it I realized that I totally went about it the wrong way. I hope you'll accept my apology, although it's a little late for that :(
ReplyDeleteAnyway, sorry about that and hope to continue to drop by. But for the most part, I"ll keep my mouth shut :)
Welcome back, and I sincerely apologize for my naivete when it comes to blogging, I really want to have a warm welcoming blog, I really need the help getting there.
ReplyDeleteWow these are simply gorgeous! Fantastic job. Such a neat way to customize your lighting. Hope you are enjoying your weekend ~ Stephanie Lynn
ReplyDelete